
Oracle Data Integrator 11g (11.1.1)
Deleting Essbase Member through ODI
1) Requirement:
Using the sample ASO database ASOsamp.Sample, the objective is to remove from the Products dimension the member “Handheld/PDAs” and its children. Only two columns are required in the source to carry out the deletion process, the required information is the parent member and the member itself.

2) Creating Hyperion Essbase Data Server, Physical Schema, Logical Schema and Data Model
Step: 1) Go to Start -> Program Files -> Oracle -> Oracle Data Integrator explore ODI and login to work repository

Step: 2) After successfully login to work repository go to Topology Navigator select Physical Architecture Tab and select Technology and expand it. Go to the Hyperion Essbase Right Click and select ‘New Data Server’.

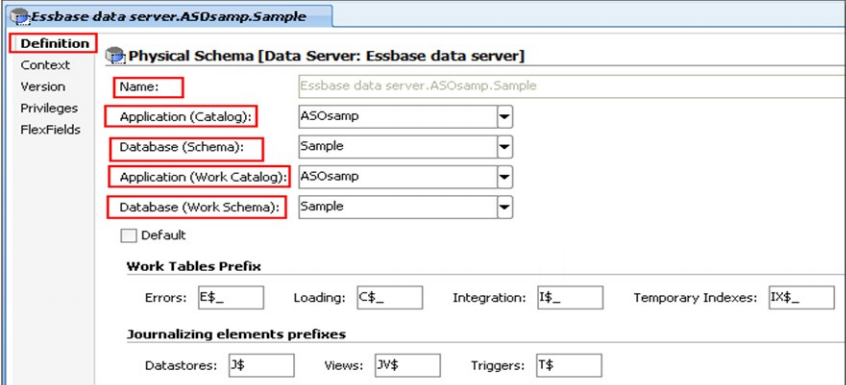
Step: 3) In the definition tab enter the following details as shown in the picture below:

Step: 4) Click on Save it will ask you to create physical schema press ‘OK’.

Step: 5) In Technology Tab go to Hyperion Essbase expand it and select newly create data server Right Click and select ‘New Physical schema’.

Step: 6) In the definition tab enter the Essbase Application name to which you want to connect.
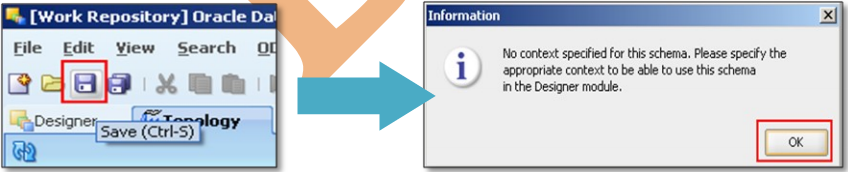
Step: 7) Click on Save it will ask you to specify the context press ‘OK’.

Step: 8) Go to the Logical Architecture tab Expand Technologies and select Hyperion Essbase Right-click and select ‘New Logical Schema’.

Step: 9) Give appropriate name to logical schema and set the Context to Hyperion Essbase physical schema.

Step: 10) Click on ‘Save’.

Step: 11) Go to the ODI Designer and create new Project with appropriate name.

Step: 12) Click on ‘Save’. You can check in the project tab

Step: 13) Expand project go to knowledge module right click and import following knowledge modules.
RKM Hyperion Essbase
LKM Hyperion Essbase Metadata to SQL
IKM SQL to File Append
LKM Hyperion Essbase Metadata to SQL
IKM SQL to File Append

Step: 14) Press Ctrl and select all three knowledge


Step: 15) Now go to the model tab and create new model Folder.


Step: 16) Now go to the model tab and create new model.

Step: 17) In the definition tab enter the details

Step:18) Go to the Reverse Engineer tab select customize check box and enter details as follows:
 Step: 19) ‘Save’.
Step:20) Newly created Model will be available for Reverse Engineering go to Model tab select Hyperion planning model and Right Click and select Reverse Engineers. Before Reverse Engineer the models make sure your agent services are running if not start it with following command:
C:\oracle\Middleware\Oracle_ODI1\oracledi\agent\bin>agent –NAME=localagent

Step: 21) Now you can reverse engineer it.


Press ‘OK’.
Step: 22) Go to the Operator Tab check whether the Execution run successfully or not.

If all the checks are green that means your model reversed successfully.
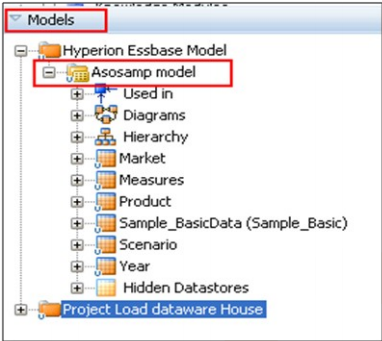
Step: 23) Go to the Designer and open model tab expand Hyperion Essbase model again. You can check all the dimensions are visible there from your Essbase application.
3) Creating Source File technology Data server, physical schema, Logical schema and model
Step: 1) Go to Topology Navigator select Physical Architecture Tab and select Technology and expand it. Go to the File Right Click and select ‘New Data Server’.

Step: 2) Go to JDBC tab specify following details
 Step: 3) Save it..
Step: 4) In Technology Tab go to File expand it and select newly create data server Right Click and select ‘New Physical schema’.

Step: 5) In the definition tab enter the Directory location which contains the file to which you want to connect.

Step: 6) Click on Save it will ask you to specify the context press ‘OK’.
Step: 7) Go to the Logical Architecture tab Expand Technologies and select File Right-click and select ‘New Logical Schema’.

Step: 8) Give appropriate name to logical schema and set the Context to Text physical schema.

Step: 9) Click on ‘Save’.

Step: 10) Now go to the model tab and create new model Folder.


Step: 11) Now go to the model tab and create new model inside the Text File Model Folder. In the definition tab enter the details

Step: 12) ‘Save’.


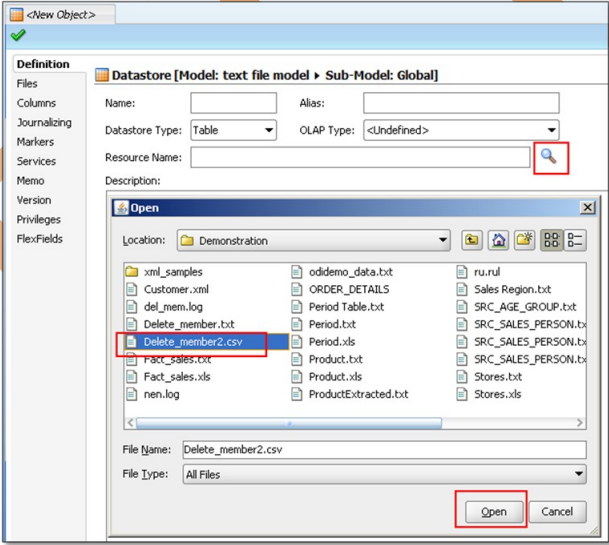
Step: 13) We need to create new data store for source text file. Select the model Right click and select New Data Store. In Definition tab enter the name then click on Resource Name browse button select you text file from open dialog box and press ‘Open’.


Step: 14) Go to file tab select file format as delimited set heading to 1 and field separator to Comma (,).

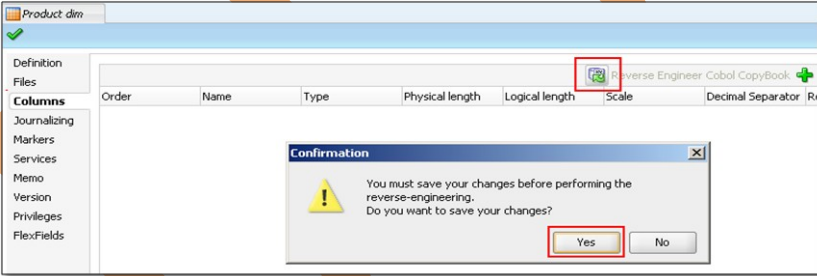
Step: 15) Now go to Column tab and click on reverse engineer button.
 Step: 16) Save it.

4) Create Interface
Step: 1) Source is ready, now we will create the interface. Select same project that we have created previously open it and select interface right click and new interface.


Step: 2) Go to mapping tab and drag Product datastore from Text file model and drop it to source area. Similarly drag Essbase Product datastore to target place. It will ask you for auto mapping press ‘Yes’.


Step: 3) Make sure you set the target Parent/Child columns to execute on the staging area as the essbase technology has no JDBC capabilities.
Go to overview tab and select staging area different from target check box.
Go to overview tab and select staging area different from target check box.

Step: 4) Now go to Flow tab where you specify the Knowledge module for the interface these are the required knowledge module. If you have not imported it till now import it.
i) LKM File To SQL
ii) IKM SQL TO Hyperion Essbase (Metadata).
ii) IKM SQL TO Hyperion Essbase (Metadata).

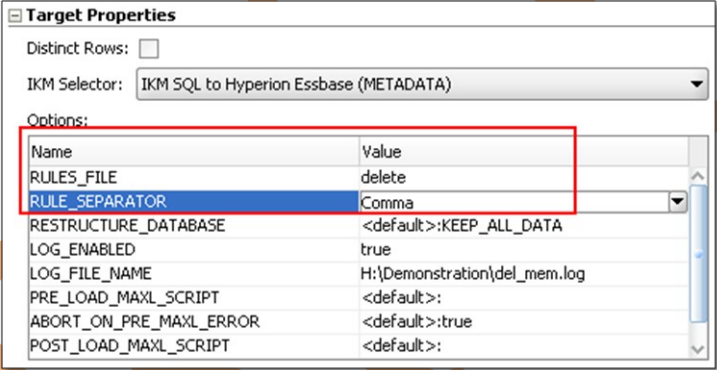
Step: 5) In the flow set the target KM to “IKM SQL to Hyperion Essbase (Metadata)” In the KM options provide an essbase load rule name (it doesn’t exist at the moment) Turn on logging and error logging and provide a full path and filename for the logs, the error log is required to make sure there were no failures in performing the dimension build.
Save the interface but don’t run it.
5) Setting up Rule File:
Save the interface but don’t run it.
5) Setting up Rule File:
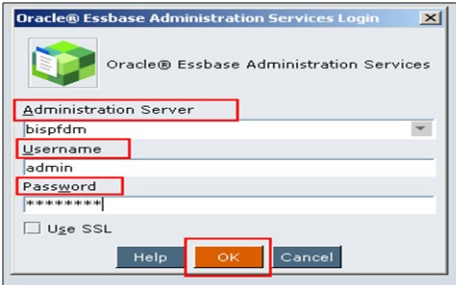
Step: 6) Now we will login to the Essbase Administration Services [EAS]

Step:7) Once logged into EAS and have expanded the essbase server, right click the essbase database and create a new load rule.

Step: 8) Open the data file for creating rule file.

Step: 9) Go to the Data Source Property and change the delimiter to Comma.

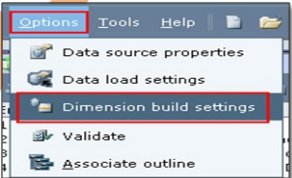
Step: 10) Select “Options” > “Dimension Build Settings”, click the “Dimension Build Settings”

Step: 11) Double click the dimension you are removing the members from, in my example this is Product.

Step: 12) Use parent/child references” has to be selected as the build method as this is the only way to perform hierarchy builds when using ODI.

Step: 13) Now for the important part in the member update section “Remove unspecified” must be specified. Remove unspecified basically deletes the members in the selected dimension that do not exist in the source, click OK.

Step: 14) Next the columns in the rule need to be matched to the output from ODI. Select Field properties > Dimension Build Properties.


Step: 15) Save the rule file and specify the same name in the KM options.
Step: 16) The interface can now be executed within ODI.


Step: 17) Go to the Operator Navigator and check the execution log of the interface.

If the interface successfully completes it doesn’t mean the members were definitely removed, the best place to check is to see if the error log generated contains any records.

The Outline file says that the Member is deleted
Method: 2
1)Requirement:
Method: 2
1)Requirement:
There are situations where you may not have the full dimension hierarchy Available so the last method does not work for you.
The end solution for today is to provide a flat file in parent/child format with only the members we want to remove from the outline. Once again I will be using the ASOSamp.Sample essbase database and using ODI 11G.
Highlighted are the members that are going to be deleted from the product dimension.

Below is the flat file that contains the members that are going to be deleted in parent/child format.

2) Setting Up the Environment:
Step: 1) We need to create new data store for source text file. Select the model Right click and select New Data Store. In Definition tab enter the name then click on Resource Name browse button select you text file from open dialog box and press ‘Open’.


Step:2) o to file tab select file format as delimited set heading to 1 and field separator to Comma (,).

Step: 3) Now go to Column tab and click on reverse engineer button.

 Step: 4) Save it.


Step: 5) We want to be able to use this solution across other dimensions in the essbase database instead of having to create an interface per dimension, so the next step is to create a variable that can be used to define which dimension to use.

Step: 6) The products Datastore was duplicated, any of the standard dimensions could have been duplicated. I say standard dimensions as a measures type dimension contains additional columns.

Step: 7) The duplicated Datastore was renamed and the Resource Name set as the variable that was created earlier which was #DELETE_DIM. This means I can pass the variable value to set which dimension I want to use in the extract interface.

Step: 8) Next step is to create an interface that will extract the dimension members from essbase.

I am using the memory engine as the staging area as the complexity and size of the output extract is not that large.
Step:9) In the mapping area the StandardDimension Datastore was dragged on to the source, in the target I am using a temporary Datastore, as I am using the memory engine as the staging area this means that a temporary table will be created in memory when the interface is executed.

Step: 10) The temporary DataStore was named and two columns added, in the properties area for each column a name was given and Datatype was set to VARCHAR (80 length as this is the maximum length for essbase member names)
The target columns were mapped to the source, PARENT to ParentName and MEMBERNAME to MemberName.
The target columns were mapped to the source, PARENT to ParentName and MEMBERNAME to MemberName.

The aim is to remove the members in the source flat file that was created earlier from the members that have been extracted. this is we perform with the use of DataSets.
DataSets basically lets you have a group of source Datastores and these Datastores can be merged into the target Datastore using operators such as UNION,UNION ALL, MINUS and INTERSECT.
With this new functionality I can add a new DataSet that will be the source flat file and use the operator of MINUS to compare the source flat file from the dimension member extract.

Step: 11) The existing DataSet was named as “ExtractProduct” and a new one created called “LoadMinusProds”, the operator was set to MINUS.

Once a new DataSet has been created you will notice that tabs are generated to distinguish between each set
Step: 12) The flat file Datastore containing the members to delete was dragged on to the source area, the columns were then mapped to the temporary target table.

If you look at the flow diagram you get more of an understanding of what is happening, member information is extracted from essbase using the KM “Hyperion Essbase METADATA to SQL” and loaded into a temporary table in the staging area (memory engine). The flat file is loaded into a temporary table in memory.
These two temporary tables are compared using the MINUS operator and finally loaded into the temporary in-memory table “PROD_EXTRACT”. The PROD_EXTRACT tables should only contain the parent/child members that need to be kept in the dimension.

If you run the interface in simulation mode (another nice feature in 11G) and look at step 14 “… Insert new Rows” you can see the MINUS SQL in operation.

Step: 13) In the LKM options for extract the dimensional information the MEMBER_FILTER_CRITERIA was set to Descendants and MEMBER_FILTER_VALUE set to the variable value stored in #DELETE_DIM (which is products), Descendants was chosen as I didn’t want to include the dimension name in the extract as the extract includes a parent of NULL and this causes an issue when running the dimension build later on.
Using the variable in the filter value option means the interface doesn’t need to be updated if it is ever used against a different dimension all that is required is to set the variable.

Step:14) When the interface loads the subtracted records into the temporary table PROD_EXTRACT the IKM options of CREATE_TARG_TABLE and DELETE_ALL were set to true, this is because the temporary table may not exist in memory so create it if it doesn’t and if it does exist delete all the records.

Right, so now an interface exists that will load only the records we want to keep in a dimension and store this in a temporary in-memory table.
3) Create Interface
Step: 1) Source temporary interface is ready, now we will create the interface. Select same project that we have created previously open it and select interface right click and new interface.
Step: 1) Source temporary interface is ready, now we will create the interface. Select same project that we have created previously open it and select interface right click and new interface.


Step: 2) Go to mapping tab and drag temporary Interface Extract from Project tab and drop it to source area. Similarly drag Essbase Product datastore to target place. It will ask you for auto mapping press ‘Yes’.
The interface that has just been created (EXTRACT) was dragged on to the source so the temporary table Target_dataSource becomes the source.
The essbase dimension Datastore that was duplicated earlier is dragged to become the target The target dimension that is used in the interface is set by the value stored in the variable #DELETE_DIM


4) Setting up Rule File:
Step: 1) Now we will login to the Essbase Administration Services [EAS]
Step:2) Once logged into EAS and have expanded the essbase server, right click the essbase database and create a new load rule.

Step: 3) Open the data file for creating rule file.

Step: 4) go to the Data Source Property and change the delimiter to Comma.

Step: 5) Select “Options” > “Dimension Build Settings”, click the “Dimension Build Settings”
Step: 6) Double click the dimension you are removing the members from, in my example this is Product.

Step: 7) Use parent/child references” has to be selected as the build method as this is the only way to perform hierarchy builds when using ODI.

Step: 8) Now for the important part in the member update section “Remove unspecified” must be specified. Remove unspecified basically deletes the members in the selected dimension that do not exist in the source, click OK.

Step: 9) Next the columns in the rule need to be matched to the output from ODI. Select Field properties > Dimension Build Properties.


Step: 10) Save the rule file and specify the same name in the KM options.

5) Creating Package
Step: 1) Create a package to put this entire step together..
Step: 1) Create a package to put this entire step together..

Step: 2) Go to the Diagram tab and drag the Delete_Dim, temporary interface extract and Interface int member delete and arrange them in following sequence.

Step: 3) Save it and execute it.


After successfully executing the package you can go to the outline file and validate it the members from the flat file have been deleted from the hierarchy.

The Outline file says that the Member is deleted
If I want to use the package to delete members from a different dimension it is as easy as setting the DELETE _Dim variable to a different dimension name and updating the flat file to include the members that need to be deleted.
excellent posts on the oracle data integrator..
ReplyDeleteSAS online training in hyderabad
This post is much helpful for us. this is really very massive value to all the readers and it will be the only reason for the post to get popular with great authority. oracle DBA training
ReplyDeleteI would really like to read some personal experiences like the way, you've explained through the above article. I'm glad for your achievements and would probably like to see much more in the near future. Thanks for share.
ReplyDeleteJava training in Bangalore | Java training in Kalyan nagar
Java training in Bangalore | Java training in Jaya nagar
Selenium training in Chennai | Selenium training institute in Chennai | Selenium course in Chennai
Selenium training in Bangalore | Selenium training institute in Bangalore | Selenium course in Bangalore
I read this post two times, I like it so much, please try to keep posting & Let me introduce other material that may be good for our community.
ReplyDeletepython course institute in bangalore
python Course in bangalore
python training institute in bangalore
I’m planning to start my blog soon, but I’m a little lost on everything. Would you suggest starting with a free platform like Word Press or go for a paid option? There are so many choices out there that I’m completely confused. Any suggestions? Thanks a lot.
ReplyDeleteAWS Training in Marathahalli | AWS Training in Marathahalli
AWS Amazon Web Services Training in Chennai | Best AWS Training and Certification for Solution Architect in Chennai
Amazon Web Services Training in Chennai |Best AWS Training in Chennai
Nice information, valuable and excellent design, as share good stuff with good ideas and concepts, lots of great information and inspiration, both of which I need, thanks to offer such a helpful information here.
ReplyDeleteData Science course in kalyan nagar | Data Science Course in Bangalore
Data Science course in OMR | Data Science Course in Chennai
Data Science course in chennai | Best Data Science training in chennai
Data science course in velachery | Data Science course in Chennai
Data science course in jaya nagar | Data Science course in Bangalore
Data Science interview questions and answers
I found your blog while searching for the updates, I am happy to be here. Very useful content and also easily understandable providing.. Believe me I did wrote an post about tutorials for beginners with reference of your blog.
ReplyDeletePython Online certification training
python Training institute in Chennai
Python training institute in Bangalore
ReplyDeleteWhoa! I’m enjoying the template/theme of this website. It’s simple, yet effective. A lot of times it’s very hard to get that “perfect balance” between superb usability and visual appeal. I must say you’ve done a very good job with this.
Devops Training in bangalore
Digital Marketing Training in bangalore
Data Science Training in bangalore
Java Training in bangalore
You have provided an nice article, Thank you very much for this one. And i hope this will be useful for many people..
ReplyDeleteDevops Training in Chennai | Devops Training Institute in Chennai
This comment has been removed by the author.
ReplyDelete"Join our microsoft power bi classes to learn interactive data visualization and make smarter business decisions."
ReplyDelete