
A practical guide for
“Essbase Backup and Recovery Part II”
Backup & Recovery: Back and recovery is one of the most important strategies one should define as an administration activity. Backing up Essbase database is important to prevent data loss and other objects from any kind of loss. You take backup of database and other Essbase artifacts so that you can safeguard your important data and objects. .
We can restore the Essbase database to the point we took backup last time. For example the backup cycle is once in a week i.e every Sunday, so if the database fails on Tuesday we loss the data till Tuesday. The frequency of data backup depends on many scenarios. One of the new features that were introduced in the EPM 11.1.1.0 release is the ability to restore an Essbase database back to its original state after a database failure. Typically, restoring a database from a backup always restores the database back to the point in time when the backup was taken. In part-I of Essbase backup and recovery we are focused to basic backup and recovery strategies. Next release of this doc will talk about the Replay transaction feature.
Database Archive and Replay
When the backup operation performs the database should be in read only mode. During backup there could have been transaction that happened after that backup. But the new transactions are not backed up. We could restore the database only to the point of time of the backup. It is possible to restore the new transactions/data loads related data as well using the Database Replay feature.
The archive works in 3 steps.
1. Database should be in read-only mode by using the begin archive command.
2. Manually backup all the files listed in the archive file generated as part of the begin archive command.
3. Revert the database to the normal mode by using the end archive mode.
The backup operation can perform using the Archive and Restore feature in Essbase system 11.
Maxl Script for getting information about the necessary backup file

Now the above MaxL will create the archive list file shown below. This all are basic data base backup files which have to back up.
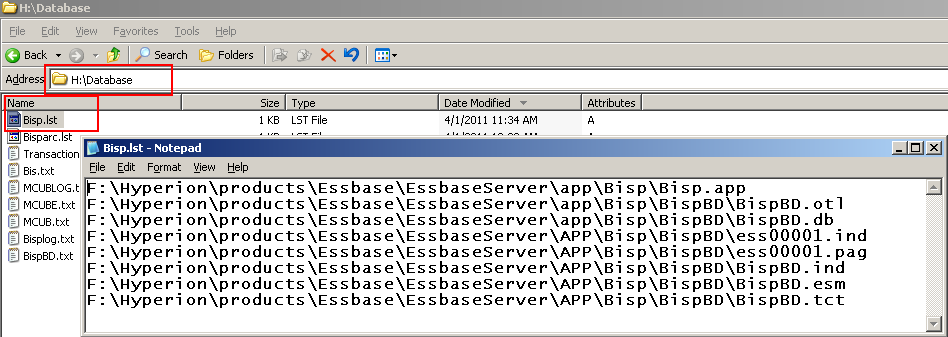
You can take back up of all files mention in “Bisp.lst” file in to a dedicated space. In system 11 you can take back up through Maxl script.

Open the folder path and you can validate weather script run successfully or not. One new file “BispBD.arc” created at the specified path.

Through the admin console you can generate archive file without creating Maxl script. Right click on database and select “Archive Database”.

You can restore the same archive file through below Maxl script.
alter database 'Bisp'.'BispBD' restore from file 'H:\DataBase\BispBD.arc';
Enable Transaction Logging
You need to enable transaction logging through Essbase configuration file. For enabling transaction logging you pass some commands in to the Essbase configuration file.

By fallowing process you can easily understand Replay option.
1. Archive the database
2. Update the data in Essbase using Excel Add-in
3. Restore the database
4. Refresh Excel report the modified data would have been lost and show previous data
5. Enable Replay to see whether you are getting the updated data from Excel Add-in
Archive, Restore Database and Replay Option
Step#1:- Open excels sheet build report using “BispBD” as database.
Here is very simple Essbase report. You can concentrate actual data for first quarter.

Step#2:- Right click on database select “Archive Database”, give file name click ok…


This is the default location for archive file.
F:\Hyperion\products\Essbase\EssbaseServer\app

Step#3:- Now submit data into the existing report through lock and send method.

Step#4:- Unload the database
Step#5:- Restore the cube back using the Restore option. Right click on database and select “Restored Database”.


Step6#:- Again get back to the Excel report and refresh the report you will have the same data that you had before the updating data.

Step#7:- Now Right click on database and select replay the transaction click ok


Step#8:- Again go back to the Excel sheet and Refresh the report. Report will show the same data that you had updated from Excel

Display Transaction
When you perform backup through archive database and restored the database, transactions that occurred during backup are not included in the restore. You can post backup transactions can be captured and replayed. Thus a backup database can be recovered to the most recent state before the interruption occurred.
How you can display transactions?
Right click on database and select “Display Transactions”, specify the output file path then click ok…..

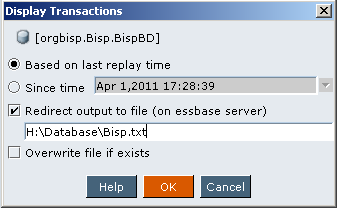
On the execution the output file will generate in to the specified folder. You can see detail transaction in to the output file.

You can also view the transaction list in to admin console. Right click on database and select “Display Transaction” click ok without specify output file path.

Replay Transaction
Replay Transactions is for restore the transactions that happened after the backup. Suppose you want restore all transactions which is in the transaction list then you need to select all the transactions check box true and click Replay button.
If you want to restore a particular transaction select that transaction from the list and click Replay button.

You can also use replay option through admin console right click on database select replay transaction.

Click ok…

No comments:
Post a Comment