Friday, September 16, 2011

Hyperion Essbase Integration

With

Oracle Data Integrator 11g (11.1.1)


Step: 1) Go to StartàProgram FilesàOracleàOracle Data Integrator explore ODI and login to work repository.


Step: 2) After successfully login to work repository go to Topology Navigator select Physical Architecture Tab and select Technology and expand it. Go to the Hyperion Essbase Right Click and select ‘New Data Server’


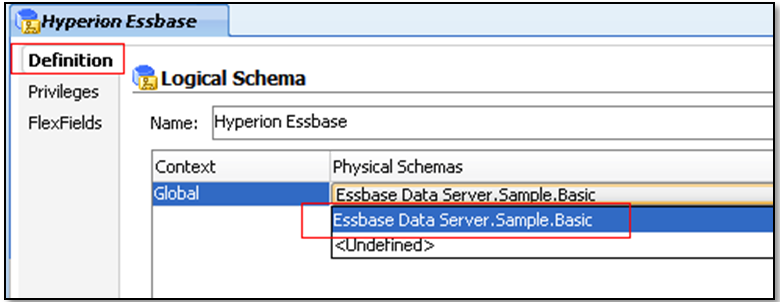
Step: 3) In the definition tab enter the following details as shown in the picture below:


Step: 4) Click on Save it will ask you to create physical schema press ‘OK’.


Step:5) In Technology Tab go to Hyperion Essbase expand it and select newly create data server Right Click and select ‘New Physical schema’.


Step:7) In the definition tab enter the Essbase Application name to which you want to connect.


Step: 8) Click on Save it will ask you to specify the context press ‘OK’.


Step: 9) Go to the Logical Architecture tab Expand Technologies and select Hyperion Essbase Right-click and select ‘New Logical Schema’.


Step: 10) Give appropriate name to logical schema and set the Context to Hyperion Essbase physical schema.


Step: 11) Click on ‘Save’.

Step: 12) Go to the ODI Designer and create new Project with appropriate name.


Step: 13) Click on ‘Save’. You can check in the project tab


Step: 14) Expand project go to knowledge module right click and import following knowledge modules.

RKM Hyperion Essbase

LKM Hyperion Essbase Metadata to SQL

IKM SQL to File Append


Step: 15) Press Ctrl and select all three knowledge
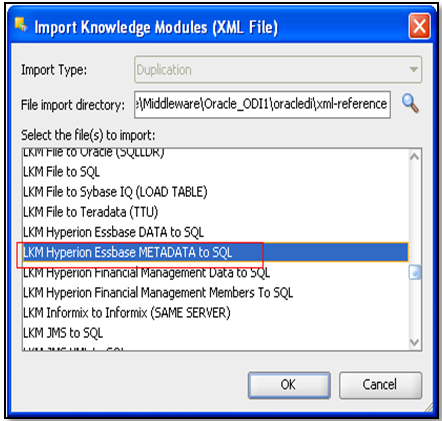


Step: 16) ‘Save’


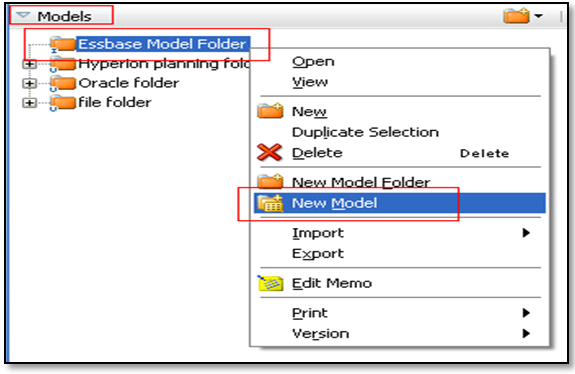
Step: 17) Now go to the model tab and create new model Folder.


Step: 18) Now go to the model tab and create new model.


Step: 19) In the definition tab enter the details


Step:20) Go to the Reverse Engineer tab select customize check box and enter details as follows:
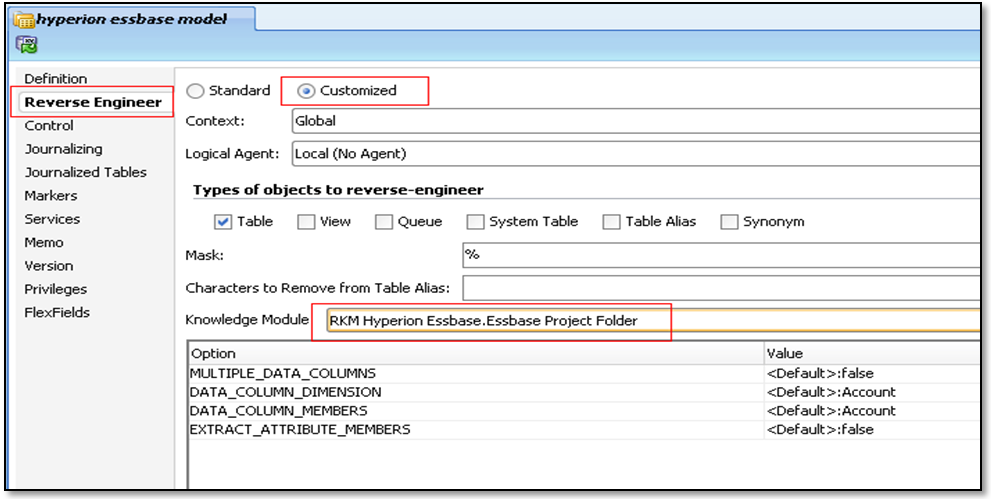

Step:21) ‘Save’


Step:22) Newly created Model will be available for Reverse Engineering go to Model tab select Hyperion planning model and Right Click and select Reverse Engineers. Before Reverse Engineer the models make sure your agent services are running if not start it with following command:

C:\oracle\Middleware\Oracle_ODI1\oracledi\agent\bin>agent –NAME=localagent


Step: 23) Now you can reverse engineer it.


Step: 24) Go to the Operator Tab check whether the Execution run successfully or not.


If all the checks are green that means your model reversed successfully.


Step: 25) Go to the Designer and open model tab expand Hyperion Essbase model again. You can check all the dimensions are visible there from your Essbase application.


I am going to be using the Data Server and Physical schema I have set up previously connecting to the Sample.Basic database. The basic database has five attribute dimensions.


The first thing to do is to create a model to hold the reversed essbase database; if you already have a model you can use the same one and run the reverse again, the important difference this time is that we are going to set an additional option for the RKM.


If you set EXTRACT_ATTRIBUTE_MEMBERS to “True” when the reverse is initiated it creates extra columns in the dimensions which are associated with attributes, e.g Product will have columns for Caffeinated, Intro Date, Ounces, Pkg Type.

So now we have our reversed model we need some source metadata to try and load into the Essbase outline.


I created a CSV file that will load a new branch to the hierarchy and set an attribute for each new level 0 member, the file was saved into the location where the file technology is pointing to (in my system directory C:\oracle\Middleware\Oracle_ODI1 \oracledi\Demo\Demonstration).

A DataStore was created using the flat file model, the file format was set to Delimited, heading set to 1 and field separator set to comma.


The DataStore was then reversed to create the column information for the flat file.


So that’s the source and target done, time to create the interface.

The interface was names and the staging area set as “SUNOPSIS MEMORY ENGINE’.
In the diagram area the flat file DataStore was dragged on to the source and the Essbase DataStore dragged onto the target, most of the columns were automapped except for the columns with spaces in such as “Pkg Type” and “Intro Date” so these were manually set up.


In the flow area, the LKM was set to “LKM File to SQL” as we are loading from a flat file.
The IKM was set to “IKM SQL to Hyperion Essbase (MetaData)”.


Rule File: Name of the Rules file to be used for metadata load.

Rule File_Separator: (Optional) Rule separator specified in the Rules file.

Valid Values

- Comma

- Tab

- Space

- Custom character; for example, @, #, ^

Restructure_Database: Performs the restructure operation on the outline after a metadata load.

The valid values are:

- DISCARD_ALL_DATA

- KEEP_ALL_DATA

- KEEP_INPUT_DATA

- KEEP_LEVEL0_DATA

The current IKM is not aware of many options for loading metadata such as your dimension build properties Allow Moves, Allow property changes to name a few, this means you have to create a load rule the same as you would if you were loading metadata into essbase.

Create a Rule file:


Save the rule file

A load rule was created and the name added to the options of the interface, if the load rule exists in the essbase app directory then the name is only required, if the rule file is elsewhere you need to enter the full path details to it.


Now execute the newly created interface..


In the essbase outline all the new members were added and the attribute information correctly associated.

Loading Data to Hyperion Essbase Application

Flat File---To--->Hyperion Essbase

Step: 1) Creating Data Store for flat files. We will use same model which we have use during data extraction from Essbase to flat file. We need to create new data store for source text file. Select the model Right click and select New Data Store. In Definition tab enter the name then click on Resource Name browse button select you text file from open dialog box and press ‘Open’.


Step: 2) Go to file tab select file format as delimited set heading to 1 and field separator to Comma (,).

Step: 3) Now go to Column tab and click on reverse engineer button.


Step: 4) we need to change the data type of Actual, Budget and Variance to Numeric because it is numeric fields.


Step: 5) Save it.


Step: 6) Source is ready, now we will create the interface. Select same project that we have created previously open it and select interface right click and new interface.


Specify the name, context and Staging area.

Step: 7) Go to mapping tab and drag load datastore and drop it to source area. Similarly drag Essbase odidemo_odidata to target place. It will ask you for auto mapping press ‘Yes’.


Step: 8) Go to overview tab and select staging area different from target check box.

Step: 9) Now go to Flow tab where you specify the Knowledge module for the interface these are the required knowledge module. If you have not imported it till now import it.

i) LKM File To SQL

ii) IKM SQL TO Hyperion Essbase (Data).


Step: 10) Save it.

Step: 11) Execute the interface.


Step: 12) Go to the operator tab and check the execution result.


Step: 13) Now go to Essbase application refresh it and check the data.


There are three methods to be able to extract data from Essbase; these are using either a Calc script (9.3 onwards), Report script of an MDX query. If your Essbase db is BSO then you will be able to use all of the methods, if it is ASO then you will only be able to use the report script or MDX query.

Using Report Script:

•Required Knowledge Modules

RKM Hyperion Essbase

LKM Hyperion Essbase Data to SQL

LKM Hyperion Essbase Metadata to SQL

Step: 1) First we need to write the Report script for sample.Basic Application this script help us to convert data into tabular format.


Make sure you use the commands {SUPALL}{TABDELIMIT}{ROWREPEAT}{NOIDENTGEN} these will format the output in the way ODI can interpret. Execute it


Step:2) now need to create target data source that can be a csv, file flat file or RDBMS. We are using text file as our target data store so take a look how it created.

Step:3) Go to the Topology Navigator select Physical Architecture and expand technology tab and go to File Right-click and select ‘New Data Server’.


Go to JDBC tab and insert following details:


Step: 4) Click on ‘Save’ Button it will ask you for register physical schema click ‘OK’..


Step: 5) Go to newly create data server Right Click and select ‘New Physical Schema’


An ODI Physical Schema corresponds to a pair of schemas:

A (Data) Schema, in which Oracle Data Integrator will look for the source and target data structures for the interfaces.

A Work Schema in which Oracle Data Integrator can create and manipulate temporary work data structures associated to the sources and targets contained in the Data Schema.

You need to manually enter the location into the Directory (Schema) and the Directory (Work Schema).

Step: 6) Now Click on ‘Save’

Step: 7) Now go to Logical architecture tab and select Technology expand it and select File Right Click and select ‘New Logical Schema’. In definition tab enter the name for the logical schema and select newly created physical schema for the global context.

Step:8) ‘Save’

Step:9) Go to the Designer navigator and select model tab and create new model folder for file Data store.

Step: 10) ‘Save’.

Step: 11) Now select newly created folder and Right Click and select ‘New Model’. In Definition tab enter details as given in below image and ‘save’.

Step: 12) Now need to create new DataStore go to newly create Model Right Click and select ’New DataStore’.

Step: 13) Enter appropriate name and browse the file you want to use as target.

Step:14) Go to the file tab and select File Format as Delimited, heading as 1 because flat file document first line contents the header and field separator as comma(,).


Step: 15) Now go to column tab and click on Reverse Engineer button.


Step: 16) Click ‘Yes’ for saving the DataStore and again click ‘Yes’ for automatically lock the object.


Step: 17) With the source and target Data Stores created the next stage is to create the interface. Go to Project tab in Designer Navigator and select previously created Essbase project and expand it and import new knowledge module LKM Hyperion Essbase to SQL.


Step: 18) Now we create new interface go to interface Right Click and select ‘New Interface’. Enter suitable name select context as Global and staging area as :Sunopsis_Memory_Engine

Step:19) Go to mapping tab and drag sample.Basic table from Essbase model to source area and target sample_basic.csv dataStore from file moldel.


When you select Auto mapping ‘Yes’ it will automatically map all same column name from source to target remaining column mapping we need to perform manually.

Step: 20) Go to Overview tab again and check the Staging Area different from target checkbox and In-Memory Engine: Sunopsis_Memory_Engine.


Step:21) Go to the Flow tab Select Source object and in LKM selector select LKM Hyperion Essbase Data to SQL. In Options set as follows:


EXTRACTION_QUERY_TYPE – ReportScript
EXTRACTION_QUERY_FILE – extract or you can put in the fully qualified Report Script file path if it is not part of the essbase database.

EXT_COL_DELIMITER - The report is tab delimited so \t is used.

Step: 22) Now select target object and set IKM Selector to SQL to File Append.


Step: 23) Click the ‘Save’ button your interface is ready to execute. Right click on interface and select Execute.


Step: 24) Now go to the Operator Navigator and check the execution successful or not and go to the file directory where your target file is located open the target file and check the load data.


Execution went successful now check target file.


Using MDX Query :

Step: 1) First we need to write the MDX Query for odidemo.odi Application this script help us to convert data into tabular format.

Step2) Execute it.

Step 3) Save it.

Step 4)We will use same odidemo.odi application from Essbase as data source which we have extracted previously.

Step 5) Create Target data source in RDBMS for loading data from odidemo.odi application.

Step: 6) Now we need to create data server for Oracle RDBMS these are the step to create it. Go to the Topology Navigator in Physical architecture expand Technology tab select Oracle Right Click and select new data Server. Specify following details:

Name: Appropriate name

Instance: orcl

User: odidemo [Schema Name where your data table is located]

Password: ******[Schema password where your data table is located]


Step 7) Go to the JDBC tab and set appropriate drivers and url for the Oracle database. Test the connection by pressing the Test connection button.


Step: 8) Save it.

Step: 9) In Technology Tab go to Oracle expand it and select newly create data server Right Click and select ‘New Physical schema’. Select schema in which your database located.

Step: 10) Click on Save it will ask you to specify the context press ‘OK’.

Step: 11) Go to the Logical Architecture tab Expand Technologies and select Oracle Right-click and select ‘New Logical Schema’.

Step: 12) Click on ‘Save’.

Step: 13) Now go to Designer Navigator and then model tab and create new model Folder.

Step: 14) Save it.

Step: 15) Now go to the newly created folder and create new model.

Step: 16) In the definition tab enter the details.

Step:17) Save the model it will visible in your model folder now select it Right click and select reverse engineer..


Press ‘OK’.

Step: 18) Go to the Operator Tab check whether the Execution run successfully or not

If all the checks are green that means your model reversed successfully.

Step: 19) Go to the Designer and open model tab expand Oracle model again. You can check all the tables’ metadata are visible there from your Oracle schema.

Now the target is ready to set for loading the data.

Step: 20) the source Essbase odidemo.odi and the target oracle RDBMS is ready. Now need to create a project and interface that help us to load Hyperion Essbase data to the target oracle data source.

Step: 21) Go to the project tab select ‘New project’


Step: 22) Save it.

Step: 23) Go to Project tab in Designer Navigator and select previously created Essbase project and expand it and import new knowledge module.

Step: 24) Import following knowledge modules


Step: 25) Now we create new interface go to interface Right Click and select ‘New Interface’. Enter suitable name select context as Global and staging area as :Sunopsis_Memory_Engine.

Step:26) Go to mapping tab and drag odidemo.odi table from Essbase model to source area and drag odidemo_db from oracle data model and drop it to target place.


Note: You need to specify the Mapping to staging area.

Step: 27) Go to Overview tab again and check the Staging Area different from target checkbox and In-Memory Engine: Sunopsis_Memory_Engine .

Step:28) Go to the Flow tab Select Source object and in LKM selector select LKM Hyperion Essbase Data to SQL. In Options set as follows:


EXTRACTION_QUERY_TYPE – MDXQuery

EXTRACTION_QUERY_FILE – extract or you can put in the fully qualified MDX file path if it is not part of the essbase database.
EXT_COL_DELIMITER - The report is tab delimited so \t is used.

Step: 29) Now select target object and set IKM Selector to SQL to SQL Append.


Step: 30) Click the ‘Save’ button your interface is ready to execute. Right click on interface and select Execute.

Step: 31) Now go to the Operator Navigator and check the execution successful or not and go to the oracle and check the load data

Execution went successful now check target file.


No comments:

Post a Comment