
“Implementing Security in
Oracle Hyperion Essbase using Shared Service”
Introduction
Shared service is a common system for managing user and group access to all oracle Hyperion products, including Essbase. The database organization, application organization and managing metadata can perform through shared services. Shared service has folder structure for Hyperion
products, all application, database, artifacts and user directory information. Folder views enable the administrator to migrate an entire folder structure or a portion of a folder structure easily using Shared Services. You can perform migration through shared service.
Launching Shared Service
You can launch shared services through below URL.
http://:28080/interop/
Click Launch Application
Oracle Hyperion Essbase using Shared Service”
Introduction
Shared service is a common system for managing user and group access to all oracle Hyperion products, including Essbase. The database organization, application organization and managing metadata can perform through shared services. Shared service has folder structure for Hyperion
products, all application, database, artifacts and user directory information. Folder views enable the administrator to migrate an entire folder structure or a portion of a folder structure easily using Shared Services. You can perform migration through shared service.
Launching Shared Service
You can launch shared services through below URL.
http://
Click Launch Application


This is the shared service console by you can manage all Hyperion products. You can perform all administration tasks through this console such as user creation, user deletion, assigning roles managing groups etc. All application manages through folder structure and allow administrator to migrate an entire folder structure or a portion of a folder structure easily using Shared Services.

Shared Services integrates the products to provide these functionalities:
1. User provisioning
2. External authentication definition
3. Task flow management
1. User provisioning
2. External authentication definition
3. Task flow management
The Shared Services server components:
1. Databases (relational and OpenLDAP)
2. Web application server
3. User Management Console
Converting Security Mode: The default Essbase security mode is 'internal security' model. In this model, we see Essbase creating users, managing their passwords, and their access all within the Essbase product. Essbase uses Essbase.sec file to store security information locally in Essbase. It is therefore possible to have an Essbase server not manage roles and access via Shared Services, but that option is becoming increasingly uncommon. Its main use is for legacy Essbase servers to 'migrate' users from their legacy versions into the System 11 world of Shared Services.
Alternatively we can externalize the security and let Shared Service manage the security for Essbase.
Benefits of externalizing the security:
1) Backup/Restore Security: Provisioning information from Shared Services can be easily exported to XML using the utility that is packaged with Shared Services. This file contains all information about the LDAP users, groups, and provisioning. This same file could be used to import the provisioning in the event of a disaster recovery, file corruption or server upgrade
2) Automatic Refresh / Synchronization: SHAREDSERVICESREFRESHINTERVAL setting in the Essbase.cfg file can establish an interval for periodic refreshes from Shared Services to Essbase. This setting is in number of minutes. To refresh every 30 minutes, the setting would be SHAREDSERVICESREFRESHINTERVAL 30
2) Automatic Refresh / Synchronization: SHAREDSERVICESREFRESHINTERVAL setting in the Essbase.cfg file can establish an interval for periodic refreshes from Shared Services to Essbase. This setting is in number of minutes. To refresh every 30 minutes, the setting would be SHAREDSERVICESREFRESHINTERVAL 30
3) Limited Admin Activities: Essbase Administration tasks confined to creation of Filters, Calculations, Load Rules, and Substitution Variables continue to be performed in the Essbase.
4) Reduced Administration: User/Group administration can be pushed to LDAP from Essbase ‘internal security’ Thus, when a new user is to be added he or she will automatically get the proper Essbase security simply through the corporate security administrator establishing the user's id in the appropriate LDAP group.
Right click on security and select externalize users.

Click for conformation

Don’t change default conversion settings click ok.

Success message of convert security mode

Working with Shared Service
Creating Group
Right click on “Groups” and select “New”
Right click on “Groups” and select “New”

Give group name and insert description about group then click next.

Select group members……
Assign group member….click next…..
Assign group member….click next…..

Assign user members for this new group……
Click finish
Click finish
 Success message
For validating new group go to the group native directory……

Creating User
Open shared service expend user directories then native directory.
Right click on user and click new
Open shared service expend user directories then native directory.
Right click on user and click new

Insert user information and click next

Assign user to the group. Click finish
 Success message
User created successfully, open user native directory for validation.

Add new Role
These are the available roles in shared services. You also can add new role through shared services.


How to create user through Maxl?
You can create new user through Maxl script by following command.
 Provide access rights to new user by following command.
Verify that access rights correctly assign to the user. When you login with the same user it will show only “Bisp” application.

Refresh Security from Shared Services
When you make changes in to shared service you have to refresh shared service security. Open Essbase Right click on security select “Refresh security from shared services”.

If you made changes for current user select current user else select refresh security for all users.
Click ok…
Click ok…
 Conform and click yes…
 Success massage
Apply Provision

Select desired roles from the available roles and save the changes.[List of roles are given in appendix]

You can validate that “ram1” can access only “Bisp” and “Sample” application.

1) Create user “Tom” through shared services Right click on user and assign the role to “Tom”.

Now log off from the existing user and login through new user “Tom”.

You can verify through right click on “Bisp” application and find that “Tom” is not administrator so that some options are disable.

Open users you can view the existing users but when you click on “Tom” or any other user only those rights will enable for which “Tom” has access rights.

Creating Filter [Cell Level Security]
You create filter through Maxl script and assign access right to any user. You can also create filter for the specific condition. The task flow will be first create filter, assign access rights to the user then login with the user and check filter is working.
1.Read Write Filter
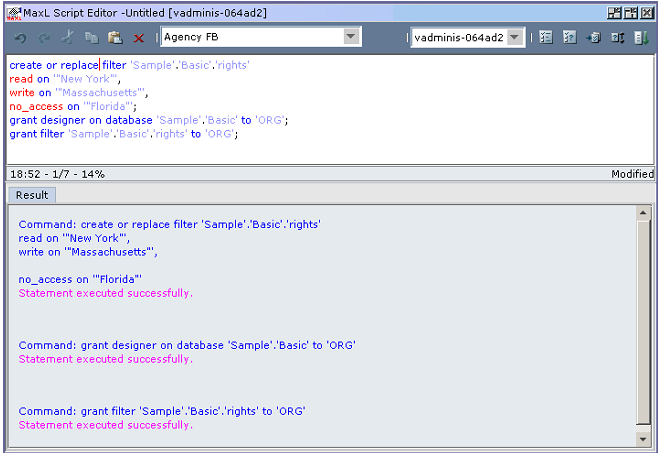
Open Maxl script and write script for creating filter for give Read Write access.
Click ok….
Open Maxl script and write script for creating filter for give Read Write access.
Click ok….
 Press enter…
Command for granting access right to the user “ORG”.
Click on Execute button……..
Click on Execute button……..

You can verify that user “ORG” has access rights to write on “Budget” through lock and send method.

Data is loaded successfully.
Again load data in actual field through lock and send method.
Again load data in actual field through lock and send method.
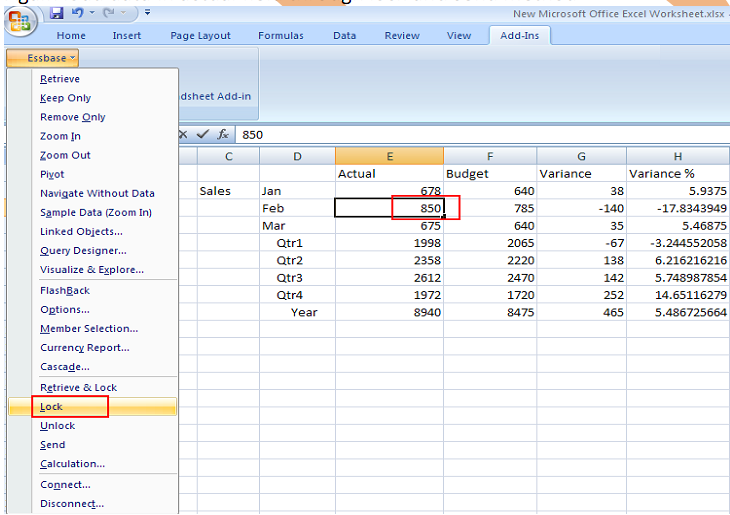
When you update data in actual field and then try to lock it Essbase throw the below error.

2. Read Filter
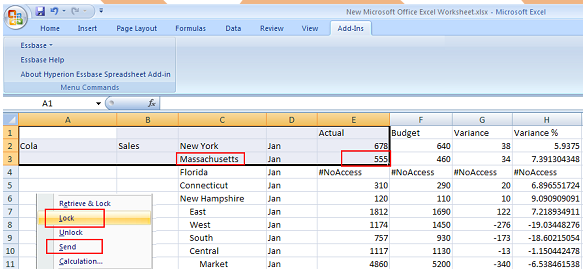
Read only filter for the specify area. This filter is to restrict user for write in to database but user can read “New York”. You have to write Maxl script to create filter and grant filter to the user.

Connect to “BispBD” database and try to update or write on “New York” data through lock and send method. Essbase will throw the below message.

3. Meta Data Read Filter
This filter is to restrict user to access all cube data. User can access data for which he has access rights. Through Maxl Script you can apply filter for metadata read only. Create new maxl script write command for metadata read shown below then grant filter to any user.
This filter is to restrict user to access all cube data. User can access data for which he has access rights. Through Maxl Script you can apply filter for metadata read only. Create new maxl script write command for metadata read shown below then grant filter to any user.

Login by user “ORG”

You can verify that “ORG” user should not access data other then “New York”.

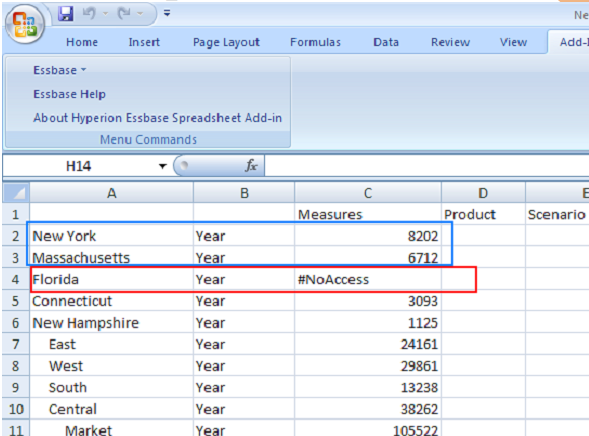
3. Read and No_access Filter
Filter on user define attributes.
Filter on user define attributes.

UDAs in outline of cube
Execute the Maxl script and see the impact on excel login through the user.

4. Read Write and No_access
Create filter for providing read, write and no_access to the user “ORG”.
Create filter for providing read, write and no_access to the user “ORG”.
 Verification of read access
Verification of write access
Database is modified.

Verification of no_access
5. Metadata Read and write filter
Filter for assign metadata.

Assigning filter to the user through console Double click on user “ORG”…..

This is the user information select “App/Db Access” tab.

Open application databases then assign filter to the user and click apply..

Login with ORG user and then try to access market. Only “East” data is visual to the user

User also has update write, So update any value through lock and send method.

To verify that data get updated or not “Retrieve” and check updated cell.

6. Filter on member Combination
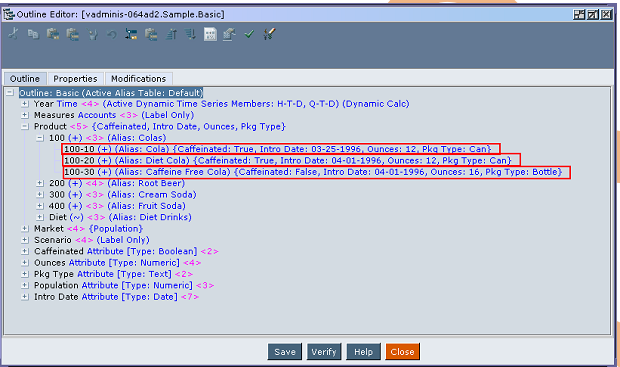
You can also create filters on various combination of members. This is the filter for giving read access to the user only for combination of product “100-10” and “New York”.

Below Maxl script for creating filter and assign to the user.

You can see in to outline the alias for “100-10” is cola.

Login with “ORG” user and see the impact of filter on cube.

7. Filter on member Combination Separately
You can also write filer on the separate bases as shown in below Maxl script.

You can access complete data which has either “Cola” or “New York”.

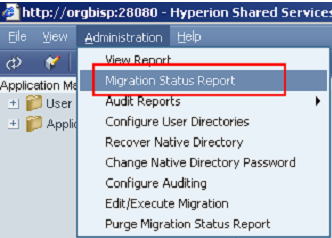
Administration Option


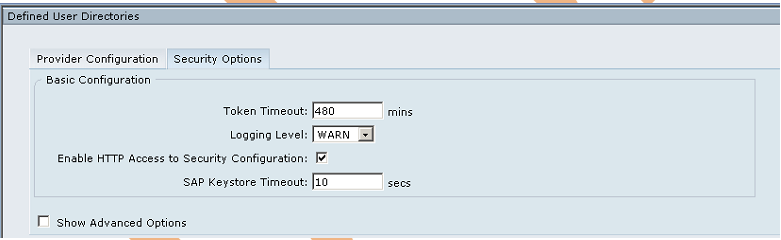
Configuring User Directories
You can configure user directory if it is required.

Native directory is already configure though there is option to edit provider configuration.

Make changes and click finish.

Recover Native Directory
You also can recover native directory if something goes wrong.

Click on start recovery

Native directory recovered successfully.

This is the Log information of native dirctory.

You can change or configure native directory password.

Panel for changing password.

Configure Auditing


Assign Access Control to Essbase Cube
Open shared service expend application group expend essbase server node Right click on application and select “Assign Access Control”.

Select user from the available user then click next.

Select database

Apply filter and calculation script

Select at least one user and click on Right check mark to validate settings.

Save the changes

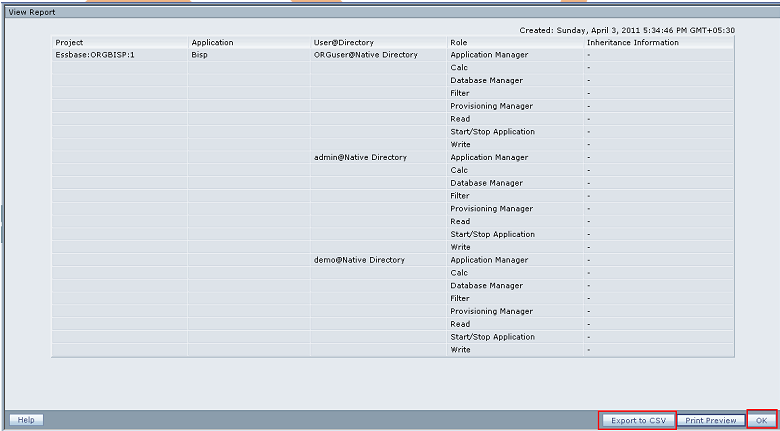
Understanding Roles
Shared Services Roles
Administrator: is the power user. He can invoke shared services and perform administration tasks for all Hyperion products. Shared service components are
Administrator Provides control over all products that integrate with Shared Services. It enables more control over security than any other Hyperion product roles. Administrators can perform all administrative tasks in User Management Console and can provision themselves. This role grants broad access to all applications registered with Shared Services. The Administrator role is, by default, assigned to the admin Native Directory user, which is the only user available after you deploy Shared Services.

Directory Manager: Creates and manages users and groups within Native Directory. Do not assign to Directory Managers the Provisioning Manager role because combining these roles allows Directory Managers to provision themselves. The recommended practice is to grant one user the Directory Manager role and another user the Provisioning Manager role.
LCM Manager Runs the Artifact Life-Cycle Management utility to promote artifacts or data across product environments and operating systems. LCM utility also use for migrate application on the same environment or different environment.
Project Manager Users who are assigned the Project Manager role can create and manage projects within Shared Services
Create Integrations Creates Shared Services data integrations (the process of moving data between applications) using a wizard. For Oracle's Enterprise Performance Management Architect, creates and executes data synchronizations.
Run Integrations Views and runs Shared Services data integrations. For Performance Management Architect, executes data synchronizations.
Dimension Editor Creates and manages import profiles for dimension creation. Also, creates and manages dimensions manually within the Performance Management Architect user interface or the Classic Application Administration option. Required to access Classic Application Administration options for Financial Management and Planning using Web navigation.
Application Creator Creates and deploys Performance Management Architect applications. Users with this role can create applications, but can change only the dimensions to which they have access permissions. Required, in addition to the Dimension Editor role, for Financial Management and planning users to be able to Navigate to their product’s Classic Application Administration options. When a user with Application Creator role deploys an application from Performance Management Architect, that user automatically becomes the application administrator and provisioning manager for that application. The Application Creator can create all applications.
Analytic Services Application Creator: The Analytic Services Application Creator can create Generic Performance Management Architect applications.
Financial Management Application Creator: The Financial Management Application Creator can create Consolidation applications and Performance Management Architect Generic applications. To create applications, the user must also be a member of the Application Creators group specified in Financial Management Configuration Utility.
Planning Application Creator: The Planning Application Creator can create Planning applications and Performance Management Architect Generic applications.
Essbase Roles
Power Roles
Administrator Grants full access to administer the server, applications and databases
Application Manager Creates deletes and modifies databases, and application settings within the assigned application. Includes Database Manager Permissions for the databases within the assigned application
Create/Delete Application Creates and deletes applications and databases within applications. Includes Manager Permissions for the applications and databases created by this user Database Manager Manages the databases, database objects, locks and sessions within the assigned application Load/Unload Application Start and stops an application or databases.
Interactive Roles
Calc: - Calculates, updates and reads data values based on the assigned scope, using any assigned calculations and filter
Write: -Updates and reads data values based on the assigned scope, using any assigned filter
Filter: - Accesses specific data and meta data according to the restrictions of a filter
View Roles
Read: - Read data values
Server Access: - Accesses any database that has a default access other than none