In Essbase one of most attractive features of version 11 is Life Cycle Management. The LCM makes your life easier by collecting all migration activities using one single wizard based approach using LCM. You can perform LCM tasks through shared service.
What is LCM: Oracle Hyperion Enterprise Performance Management System Lifecycle Management provides a consistent way for Oracle Hyperion Enterprise Performance Management System products to migrate an application, a repository, or individual artifacts across product environments and operating systems. If there is common environment, then you can migrate directly from application to application. Shared service used for migration when there is common environment. You can take back up of all artifacts through Life Cycle Management utility.
Essbase Artifacts
1. Definitions of all databases within the applications 2. Outlines 3. Substitution Variables 4. Rule Files 5. Calculation Scripts 6. Report Scripts 7. Excel Files 8. Location Aliases 9. Security Filters
Lifecycle Management for Essbase can be used in the following scenario
• Migrating users/groups/roles/privileges migrations • Backup and recovery for Essbase artifacts. • Importing and exporting artifacts for editing purposes • Using Lifecycle Management Utility to export to version control systems • Application migrations with cross-product artifact dependencies
Migration Types LCM Utility
1. Application to Application Migration – If you have multiple application of Essbase registered in the same shared services instance, then you can migrate Essbase Application & Database Artifacts to the other Essbase application through the common Shared Services.
Application to Application: You can migrate artifacts from application to application. Essbase application to application migration is possible if source and target Essbase application in the same shared services. In the below example there are two Essbase applications “Bisp” and “MDemo”, we will demonstrate how to migrate Application to Application.
Step #1 Open shared services and select Essbase in application then open source application.
Step #2
Select all artifacts and click “Define Migration”. “Bisp” is my source application and target application is “MDemo”.
Final summary of Source and target applications Select overwrite artifacts options if you want to overwrite on existing artifacts.
Step #6
Complete migration summary Click on “Execute Migration” then click ok ……..
You can go for “Launch Migration Status Report” and see the status. Launched Migration Report
Validation of Migration Process Application migration done successfully
2. Application to File System Migration – If you have multiple Essbase applications registered in different shared services. Then this utility migrates all the necessary artifacts on to the file system. Then you can move the extracted artifacts to the target machine. In the next step again use the utility from file system to the target application.
Application to file system
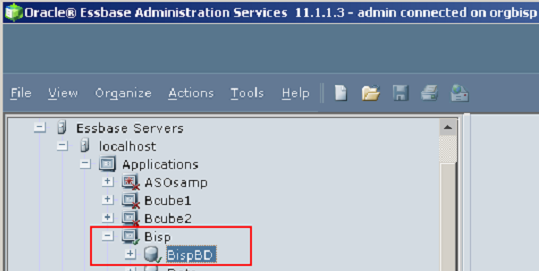
This is the Essbase application and database. We will perform LCM operations.
All file are in the “BispBD” folder before migration.
Step #1
We use shared services for LCM utility. Log in to shared service.
This is the Group of application for different application products.
Step #2
Open Essbase and select application to be migrated.
Essbase applications and their databases
Step #3
Open “Bisp” application and select database with all artifacts. These are the all artifacts of the BispBD database.
Rule files
Security file, variable and Text file.
For coping artifacts select all artifacts of application “BispBD”.
Step #4
Click on Define migration…….
Step #5
Source Application for migration Click on Next…………
Step #6
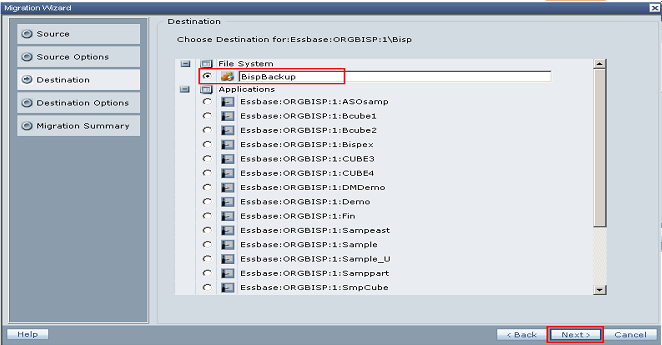
Select the destination for migration; you can simply migrate to any application or into file system. One backup file is created in this example.
Click Next………
Step #7
Description of source and destination applications Click Next………..
Step #8
Complete migration summary now click on execute migration……
Step #9
You can launch migration status report by clicking on “Launch Migration Status Report”………………..
Step #9
Migrated report status
Validate
You can see that application is successfully migrated in to file system. One new file created in the file system; it has all migrated artifacts.
Backed up artifacts
All artifacts folders backed up successfully. Backup files stored in “ \import_export\admini@Native Directory\” folder.
All backup files are in XML format. You can move all this files in other environment; were ever you want.
Calc Script
Excel Files
Location Aliases
Report Scripts
Rule Files
Security Files
Substitution Variables
Text Files
All artifacts backed up in to file system.
Some other information also stored inside the info folder.
Listing.xml
Listing file save the entire folder detailed information. This file consists of all resource name, folder id, path, pathAlias, modifiedBy, lastUpdated and description about each folder. Whatever file or folder generated during complete process.
sourceInfo.xml
Source information file save application version, variable, metadata information. This file keep product, product version, project, metadata information and LCMversion information.
File system to application Step #10
All backup of artifacts is stored in the “BispBackup” file. Select all artifacts to recover application from file system to Essbase application.
You can see all artifacts detail.
Report Script and Rule Files
Security files, substitution variable and text file
Step #11
Now the source is file system application named “BispBackup”. Click Next………
Step #12
Select destination application click next……
Step #13
Destination is new one then no need to check Overwrite Artifacts. If destination application is old one then check the overwrite artifacts. Click Next…….
Step #14
This is migration summary click on execute the migration summary.
Step #15
To see the migration report launch migration status report.
See the status of report
Validate
Select Essbase and open “LCM” application and check out all migrated artifacts. You can validate that application is migrated successfully.
Migrated application outline.
You can cross check the all files are migrated in to new application. This folder shows migrated files.
You can cross check artifacts list in new “LCM” application. Calc script, excel files and location aliases
Report script and rule files
Security file, substitution variables and text files
Migration Check List
You can create one migration check list, and check the status after migration.
Migration Check List
Migration Check List
Migration Check List
Log File
One log file creates during migrating application artifacts using LCM utility. LCM.log
This log file keeps all the information of migration process.
This file keeps all information about source and destination. All
This is the log file
Essbase Log file
LCM
The components of Lifecycle Management Utility are installed to HYPERION_HOME/common/utilities/LCM/9.5.0.0 (referred to as LCM_HOME).
Essbase Role Requirement
Users performing Lifecycle Management operations for Essbase must be assigned the following roles:: 1. LCM Administrator 2. Server Access 3. Calc 4. Database Manager
Appendix
Lifecycle Management Log Files
Lifecycle Management for Oracle Hyperion Profitability and Cost Management, Fusion Edition are listed in the Oracle Hyperion Enterprise Performance Management System Installation and Configuration Troubleshooting Guide
Note the following:
• Details are documented in the logging section of S9 Logging. • For failed migrations, the Migration Status Report provides a link to the Lifecycle Management e engine log file. The product Oracle Hyperion Enterprise Performance Management System Lifecycle Management log files are located with the products.
Sample Migration Definition Files
The sample migration definition files provided are for Financial Management Classic application migrations. The product code used in the migration definition files for Financial Management is HFM and the sample application is COMMA. All sample migration definition files are provided in LCM_HOME/samples.
Hello All,
Thanks for visiting our blog.
BISP is a Training and Consulting Company. We are Subject Matter Experts for DHW and BI technologies.We have rich experience in implementing some of the biggest Data Warehouse Projects in Banking, Finance, Sales and Market Research. The team is lead by Amit Sharma. A well Known name in Hyperion/OBIEE training and consulting with more then 10+ experience in DWH and BI. We assist organizations and individuals to learn and build their career in Data Warehousing technology stack. We have in-house technology experts therefore we prepare the technical documents, case studies, white papers, video sessions for OBIEE, Hyperion, Cognos, ODI, Informatica Oracle Middleware and MS BI. We provide very high quality training and consulting in these subject area.
Amit Sharma[amit.sharma@bispsolutions.com]
www.bisptrainings.com
www.hyperionguru.com
learnodi.blogspot.com
essbaseguru-amit.blogspot.com
learnplanning.wordpress.com
learnsqlquery.wordpress.com
learncognosreports.wordpress.com
bispsolutions.wordpress.com
odinetwork.blogspot.com
learnsoa.wordpress.com
bispinformatica.wordpress.com
bispteradata.wordpress.com


 Step #4
 Step #5


 Step #9


 This log file keeps all the information of migration process.
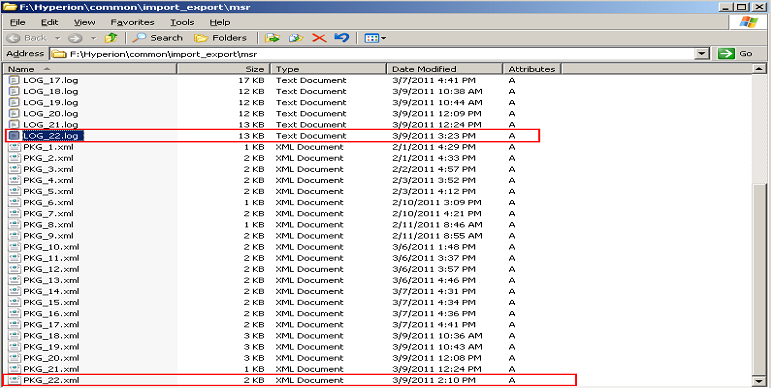 This file keeps all information about source and destination. All

 This is the log file


Nice details about migrating applications.
ReplyDeleteVB.Net Migration
This comment has been removed by the author.
ReplyDelete